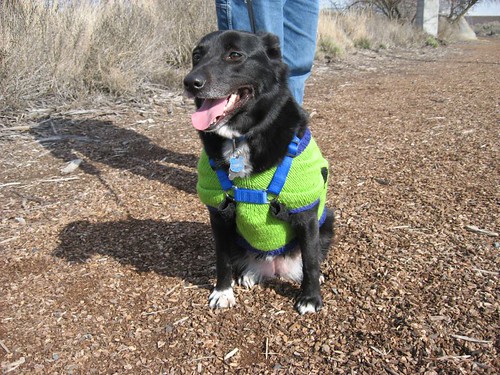
By Jessica Palmer
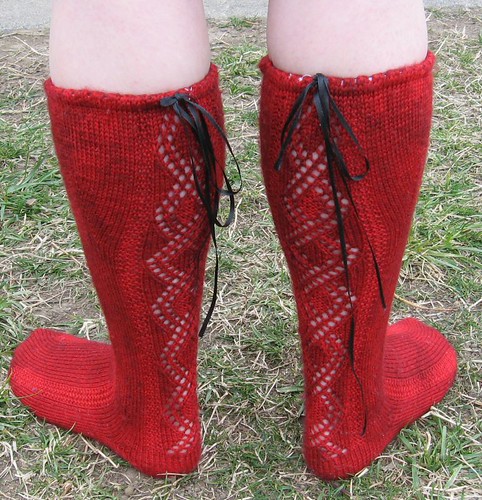
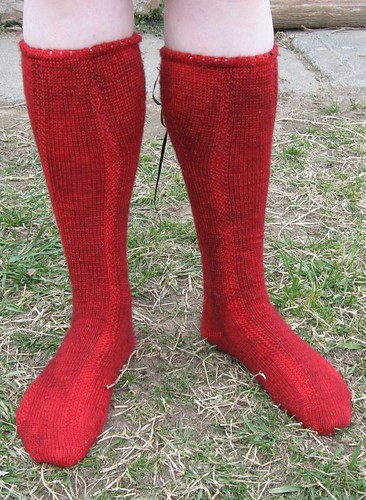
Sassenach Stockings
Materials:
- 150 - 200 grams Fingering Weight Yarn
- US 1 / 47” Circular needle or size needed to obtain gauge
- Finishing Needle
- ¼ inch elastic, 3 feet or so will be more than enough
- 1/8 or ¼ inch ribbon for the faux garter
Gauge: 36 sts over 4 inches in Stockinette Stitch; row gauge doesn’t matter much for this pattern.
Notes: These stockings are worked two at a time; toe up, with the magic loop technique. Directions will be given for one stocking, duplicate each set of directions for the second stocking. You may either work from both ends of one ball or from 2 separate balls, just remember to switch yarns each time you switch stockings!
Directions:
1. Cast on 12 stitches for each stocking, using a different strand of yarn for each stocking. Backwards loop cast on recommended.
2. Knit 11. Drop the slip knot off your needle without knitting it. (11 sts for each stocking)
3. Pick up and knit 11 stitches from the underside of your cast on. These should be situated opposite of the first 11 stitches on your needle to form the underside of the toe. You should now be set up in the traditional magic loop stations, two sets of 11 on the front half waiting to be knit and two sets of eleven on the back half. (22 sts for each stocking)
4. Begin toe increases:
Round 1: *K1, M1, knit to one stitch before end of each stocking half, M1, K1* Repeat for each half of each stocking
Round 2: Knit all stitches
5. Repeat rounds 1 and 2 until there are enough stitches to fit snuggly around your foot (7.5 inch foot: 60; 8 inch foot: 64; 8.5 inch foot: 68; 9 inch foot: 72 stitches). Since the number has to be a multiple of 4 to work in the pattern, and you need an odd number on each needle, one needle will have one extra set of increases. These extra 2 stitches will be added to the bottom of your foot, so the set up of stitches on your needles should be: (Size: top & bottom) 7.5: 29 & 31; 8: 31 & 33; 8.5: 33 & 35; 9: 35 & 37
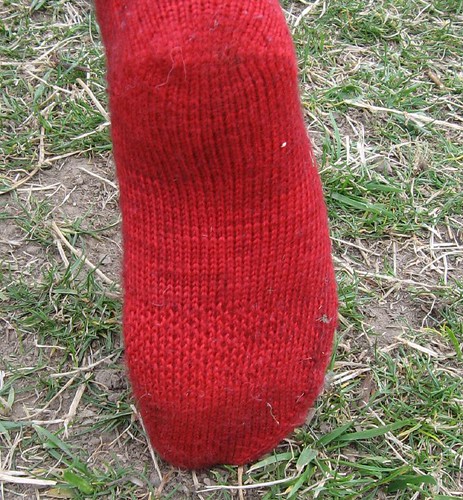
6. When desired number of stitches has been reached, knit evenly until toe measures approximately 2 inches, or just to base of toes.
7. Begin instep pattern:
1. K6 (7, 8, 9), p1, k15, p1, k6 (7, 8, 9).
2. k5 (6, 7, 8), p1, k1, p1, k13, p1, k1, p1, k5 (6, 7, 8).
8. At the same time begin working padding on the foot:
1. *slip 1, k1* across bottom of foot
2. knit all stitches
3. *k1, slip 1* across bottom of foot
4. knit all stitches
9. Work in pattern for instep and bottom of foot until foot pad is long enough to cover the ball of your foot, approx 2 inches.
10. Continue instep pattern, and knit all stitches on the second needle until sock measures 1.5 – 2 inches shorter than desired length of foot.
11. Work your favorite toe-up heel. I like the short row heel, but many people like toe-up heel flaps. You will need to start the heel flap heel at 4 inches before desired foot length. For some easy tutorials on short row heels, check out these links:
http://misocrafty.squarespace.com/journal/2006/9/21/short-row-heel-tutorial.html
http://www.cosmicpluto.com/blog/?p=585
http://www.thedietdiary.com/blog/lucia/554 (this is a great one if you’ve never done short row heels before)
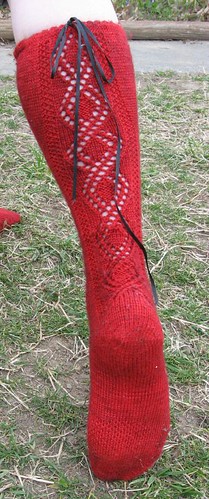
12. Keeping shin section in original pattern, work ½ inch plain over calf stitches, then begin working chart as follows:
NOTE - there is a plain row in between charted rows that is not reflected in the line numbers on the chart!
1. K6 (7, 8, 9), p1, k1, p1, work chart, p1, k1, p1, k6 (7, 8, 9)
2. K5 (6, 7, 8), p1, k1, p1, knit the knits and purl the purls, p1, k1, p1, k5 (6, 7, 8)
14. Continue to work even until are 2 – 2.5 inches below the largest part of your calf.
15. Now you’ll have to do a little math – not much, but a little. I’ll break it down as much as I can for you.
1. Measure the circumference of your calf at it’s largest point (in inches): C=___
2. C*0.9=____= i (inches for calf)
3. i * 9(gauge)=____=S (total stitches needed for calf)
4. Once you have S, round to the nearest multiple of 4 and begin calf increases.
16. Work increases as follows:
Needle 1: k1, m1, work in pattern until 1 stitch remains, m1, k1
Needle 2: k1, m1, work in pattern until 1 stitch remains, m1, k1
Work 1 round even.
17. Continue increasing until you have S stitches total. Then work even, in pattern, for each round until you are ½ inch from the desired length.
18. Knit ½ inch without any patterning. Next round: *k2tog, yo* Knit another ½ inch.
19. Do not cast off! Sew the live stitches down, one at a time, folding at the k2tog, yo row, to form a picot hem.
20. Weave in your ends. Cut the elastic long enough to fit snugly, without stretching too much, around your leg, just below the knee. Thread through your elastic and ribbons through the picot hem, leaving the ribbon ends hanging out one of the YO holes so that you can tie in a bow. Make sure to sew the ends of the elastic together before letting it escape into the hem! I just used a quick overhand stitch to secure the ends, overlapping them about ½ an inch and stitching the overlapping ends together.